Blog Organization 101
This blog outlines a step-by-step process to help you easily produce more blog content. Blog organization is key in your blogging journey, and I want to share my findings so you can avoid the same time-sucking mistakes I made.
Starting a new blog can be intimidating. At least, it was for me. I dreamt about creating my blog for over a decade but never did because “where do I start??”
It took me MONTHS to figure out all of the ins and outs of proper WordPress publishing. In hindsight, I really wish I would have made more of an effort because now that I’m in it, I realize it’s not so hard. My hope for you is that this guide will fast-track your progress and build habits.
Start With Tools
Get Your Grammar in Check
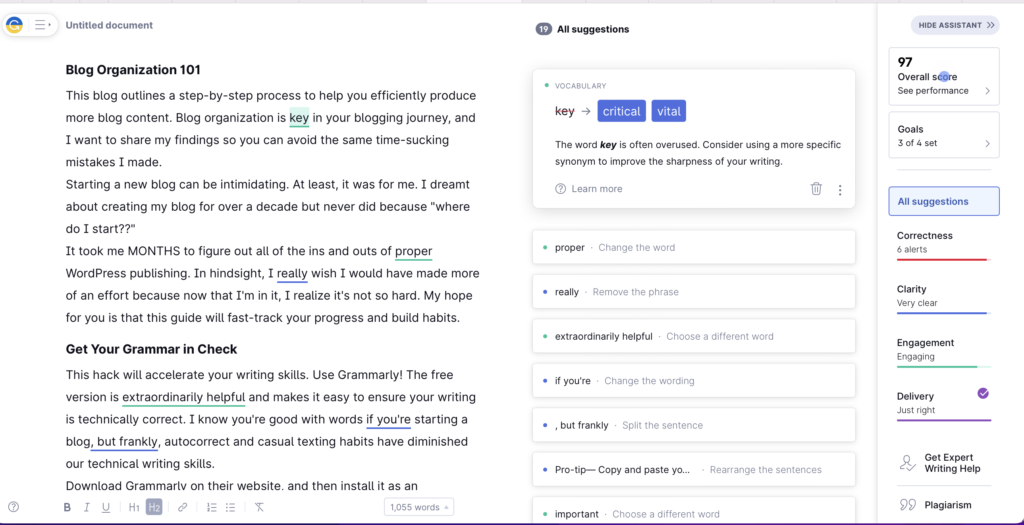
This hack will accelerate your writing skills. Use Grammarly! The free version is extraordinarily helpful and makes it easy to ensure your writing is technically correct. I know you’re good with words if you’re starting a blog, but frankly, autocorrect and casual texting habits have diminished our technical writing skills.
Download Grammarly on their website and install it as an “extension” or “add-on” in your web browser. Once installed, Grammarly automatically pop’s up anytime you write, offering corrections and suggestions.
Pro-tip— Copy and paste your work onto the Grammarly website. This will allow you to independently identify passive voice and sentence structure issues and make revisions. Even if you do not have the premium version, Grammarly will highlight any text it has suggestions for without offering the correction.
That being said, I must advise that although this is a great tool, it’s important to know that AI is far from perfect. There are many times I bypass suggestions because it takes away from my intended tone or message. Be sure to carefully consider Grammarly’s suggestions before accepting the edit.

Pick One Day a Week for Keyword Research
Keyword research is a must if you plan to have a successful blog. Well-chosen keywords will get you discovered on Google and other search engines!
Keyword research is essential but can be time-consuming and tedious. I recommend setting aside one morning or afternoon to compile a list of keywords you expect to use that week.
I use Keysearch, and I’m pleased with it, although there are many other free resources. If it’s in your budget, go ahead, save time and jump in with Keysearch. But if it’s not yet, you can look into Google Trends, Google Keyword Tracker, and Keywords Everywhere.
IMPORTANT— type your keywords into the “focus keyphrase” bar of your Yoast or All-In-One SEO analyzer.
Streamline Your Writing Process
Create Three Headlines at a Time
Now that you have your keywords, you can pre-plan a few headlines. Having headlines mapped out ahead of time will create a sense of achievement and inspire you to follow through!
Pro-Tip— The WordPress Plug-in, Monster Insights, comes with a headline analyzer that I love! Super helpful.
Start With An Outline
Once you’ve perfected your headline, it’s best to start your outline. Your outline can be done directly in WordPress. Create 5-10 subheadings that you want to cover in your post. Bonus- don’t forget to use your keyword in subheadings for optimized SEO!
Remember that readers are most responsive to content that is broken up into skimmable pieces. For example, think about your reading style— unless you’re reading a book, I bet you aren’t attracted to long paragraphs.
You can see an example right here in this post! Feel free to copy the format for your next post.
Write Your Heart Out
With your headline and outline completed, you now have an easy guide to completing your post. It’s time for the meat and potatoes!
To speed things along, I like to type everything that comes to mind. Even if the thought isn’t fully developed, I want to get it down before losing it. Don’t worry too much about technicality here. You will come back later and clean it up.
Edit Ruthlessly
It’s time to trim the fat. Remove any redundant information, anything that takes away from your primary message.
Check your readability score and make sure it’s in the green. Check for consecutive sentences, paragraph length, and sentence length— and make sure you are writing in an active voice, using transition words.
To get the most out of Grammarly, view your post in preview and copy-paste it onto the Grammarly website.
Proofread
Do a final comb-through and look for any technical errors you may have missed. Be on the lookout for missing words, repeated words, and punctuation accuracy.
Remember, you can use Grammarly for this!
Blog Organization Final Touches
We’re almost done with our blog organization routine! DO NOT publish until you have completed the following steps. These details are imperative for a successful blog.
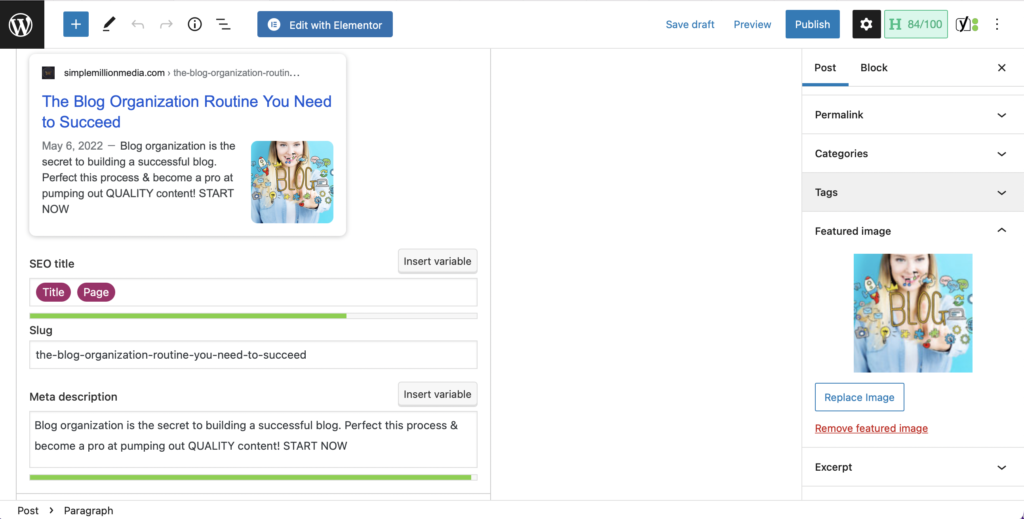
The title, slug, and meta description boxes are found at the bottom portion of your screen in your WordPress post editor. The tags, categories, and featured images are right under post settings. The image below is a screenshot from the exact post you are reading now.

Add Images and Alt Descriptions
Quality images are vital for successful blog posts. And each image should include an alt description that includes your keywords. Write it as if you are describing to readers, not just keyword stuffing for the algorithm.
You will need to add images into your text’s body and a featured image. Add your featured image in the settings section under “post” on the right of your WordPress screen.
Pro-tip — You can find royalty-free images on websites like unsplash.com and Pixabay.com
Add Outbound and Internal Links
Now that you’ve laid out your content, comb through your work and identify where you can add a hyperlink. Links add engagement by directing your reader to other posts on your website and introducing your offers.
Hopefully, you have affiliate links to include as well!
Compose Meta Description
Your meta description must include your keywords, preferably at the beginning. You have 160 characters to catch your reader’s attention in a way that makes them click on your link.
Crafting the best description is an art, and I promise you’ll get better with practice!
Create Slug
Your slug must also contain the chosen keywords. Keep it short with dashes between each word.
Attach Post to Category and Add Tags
Categories and Tags will boost your SEO. Make sure to include your keywords! Add these in the settings section on the right side of the WordPress draft page.
PUBLISH TIME!
Blog organization routine completed. This may seem like a lot, but it’ll be easy peasy once you get the process down. Of course, you will find your own groove and personalize this process— as long as you are hitting all the points, you can expect to see growth!
To recap, here are the steps to master blog organization—
- Grammar Hacks
- Keyword Research
- Headlines
- Outlines
- Write Your Heart Out
- Edit Ruthlessly
- Proofread
- Add Images and Alt Descriptions
- Add Outbound and Internal Links
- Compose Meta Description
- Create Slug
- Attach Post to Category and Add Tags
- Publish!
